
In a recent article, I described how to use Selenium and the Javascript Navigation API to quickly collect customized client-side performance metrics. In this article, I’ve covered the specifics of the most useful features as well as how to put up a NodeJS wrapper for the Webpage Test API and run a programmed test.
WebPageTest API
This is merely a REST API (provided by several businesses including AKAMAI, NewRelic, GoDaddy, etc., and sponsored by Google) that allows us to obtain client-side performance measurements with the ability to simulate from a certain device, location, network bandwidth, and other factors. You can see what we are capable of doing at a high level in the image below. Using a website like www.example.com, for instance, we can obtain client-side performance data with user inputs.
Link: https://www.webpagetest.org/
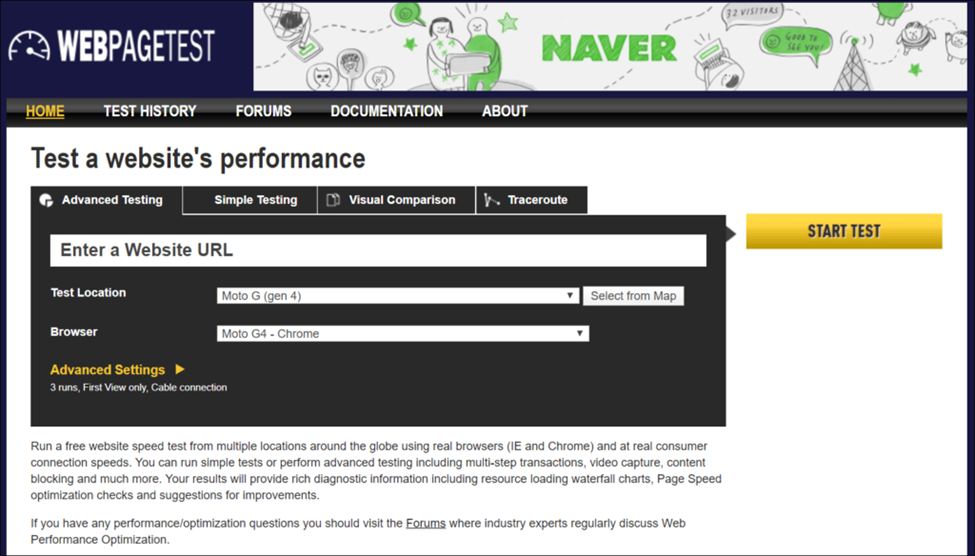
figure:01
Looking at the www.webpagetest.org home page You are not alone if you believe that this tool can only be used to test a website’s front page or landing page. By reading the sections below, I hope you’ll reconsider your presumption.
Essential Skills
- Comprehensive client-side performance analysis and suggestions
- Results of tests performed on real devices are published.
- Waterfall
- Trade HAR
- Information about the device’s resource utilization
- Simulation of Network Bandwidth/Latency
- View the video to compare two tests.
- Automated tests [In addition to the home page, we may also access information about the page that follows the login page/second page]
- Getting an email with the test results.
- To test internal websites, the full tool can be installed in AWS or as a private instance.
- SPOF test [You can test how your website behaves when a specific third-party service or server is unavailable, e.g., a CDN]
- To obtain an audit report from a performance and accessibility perspective, use the Lighthouse test (which is a component of the Chrome developer tools).
- Using a NodeJS wrapper for continuous integration.
In the end, if configured correctly, you can receive the report via email. When an automated test was run and a report was delivered to my inbox, I was overjoyed to see it. Receiving such a lot of information about your website from an open-source application is fantastic!
I have telepathic powers. You would have seen the documentation page and are now considering how to use this product right now. I’ve listed the procedures for configuring the NodeJS wrapper and a sample test that I was able to run in the sections below.
WebPageTest API: How do I use it?
Step 1:
http://www.webpagetest.org. to access the public WebPageTest instance. Try different things by running some tests on the website you like. You would like it [You can select Browser, device (mobile/desktop), bandwidth, location, etc.].
Step 2:
Ask for a key.
Visit this link to acquire the key: http://www.webpagetest.org/getkey.php
Note: Occasionally, it could take some time.
Step 3:
Recognize that using the public instance has limitations. [With your key, you can only run 200 tests per day] Expect the test results to take some time. Your test would be queued and conducted in a methodical manner if there are other tests running on the device/location you selected.
Step 4:
Explore the next level of scenarios, or scripted tests, if you are comfortable with the fundamental functions. Please see the link below for more information.
Visit this website at: https://sites.google.com/a/webpagetest.org/docs/using-webpagetest/scripting
Due to the nature of REST API, if we attempt to run a test for a page that needs session information (for example, a page that can be accessible after logging in), we must write a script to access that page by adhering to the instructions provided in the aforementioned URL. The DOM properties may be used to perform almost any user interaction, such as entering text, clicking buttons, and submitting forms. (Name, innerText, etc.), Id, etc. Please refer to the scripted exam sample below.

Figure 02: Sample scripted test
To run a scripted test, go to the front end’s Advanced Testing -> Script tab and insert the test in that test section. Keep in mind that tabs should be used to separate these commands.
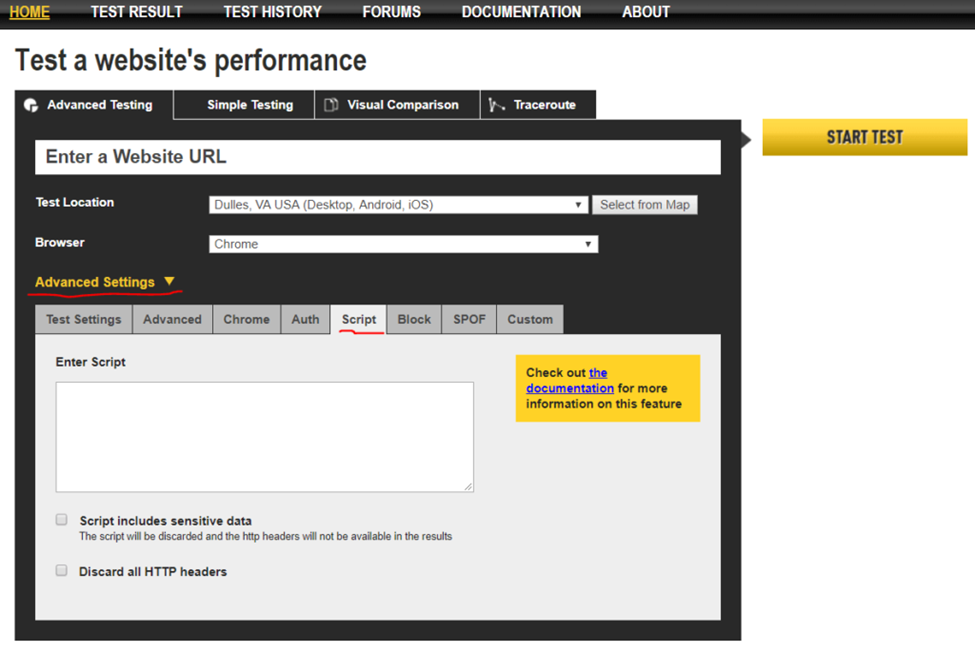
Figure 03
Note: Please be cautious when using sensitive data. (Passwords/PII data)
Wrapper for NodeJS – setup
Explore the NodeJS wrapper created by MarcelDuran once you have mastered the scripted tests that you are capable of doing. (https://github.com/marcelduran/webpagetest-api).
This really is a great feature! Don’t be concerned that you won’t be able to use this functionality if you don’t have a thorough understanding of NodeJS. You shouldn’t have any major issues learning and putting it into practice.
Should I have a solid understanding of NodeJS to run tests?
Both yes and no apply. It is better to have some in-depth understanding if you want to make more adjustments to the outcomes or how you obtain them. Otherwise, I believe you could get by with only the very minimum of und understanding if you know how to set it up and use it.
What is the benefit of using this NodeJS wrapper?
As a Javascript runtime environment, NodeJS
- Instead of using Webpagetest’s problematic UI to write script tests, you can write your tests in Javascript. (Making sure the key-value pairs are separated by tabs is a big job.)
- Use the command prompt to run them.
- Continuous integration support is provided.
How do I set up NodeJS on Windows 10?
Choose the latest Windows 10 MSI and follow the instructions on the screen. Once successfully installed, you should be able to verify as shown below.
Node.js.org/en/download is the URL.
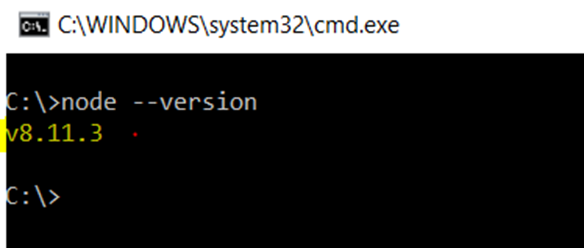
Figure 04: NodeJS Verification
Please see the NodeJS test that I was able to complete below.
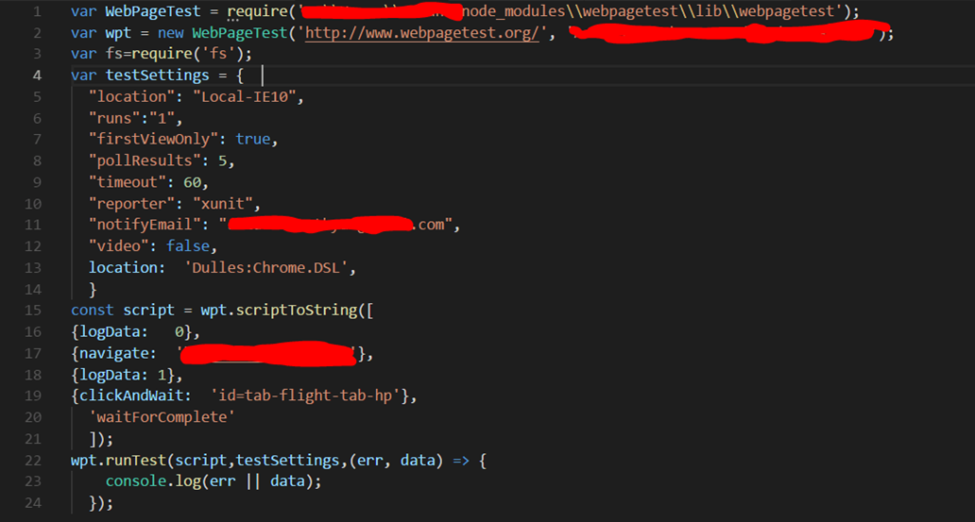
Figure 05: NodeJS Test
Reminder: Save the NodeJS code into a.js file and run it at the command prompt as shown.
Node: C: Path: Demo1.js
What does the above NodeJS code accomplish?
- This program loads the WebPageTest Javascript module so that the methods can be used.
- creates an instance or object of WebpageTest that points to www.webpagetest.org, a public instance. You can submit the information below if you have a private instance installed.)
- var wpt = new WebPageTest(‘http://private instance IP: port>/’, ‘private instance key>’); testSettings – Defines the testSettings on which the test will run. (Depending on location, device, bandwidth, etc. depending on your needs)
- script – Choose which pages you want to visit and what data the web page test should record. The aforementioned script first loads a page, clicks a specific button to go to another page and then runs the test using that page’s criteria.
- <wpt.runTest- It’s a method that you can use to invoke WebpageTest’s runTest method.
If configured correctly, the results of a successful run will be sent to the email address provided after the run. What we’ve seen so far is extremely basic usage, which you can explore and put to use as needed.